Smart Site Protection™:
Reviewing Alarm Events – web view
To review alarm events:
1. Select “Security” from the Workspace menu.
2. Choose “Alarm Events” from the left navigation drawer.
3. Select your desired site from the automatically opened site picker (you can use the search functionality)
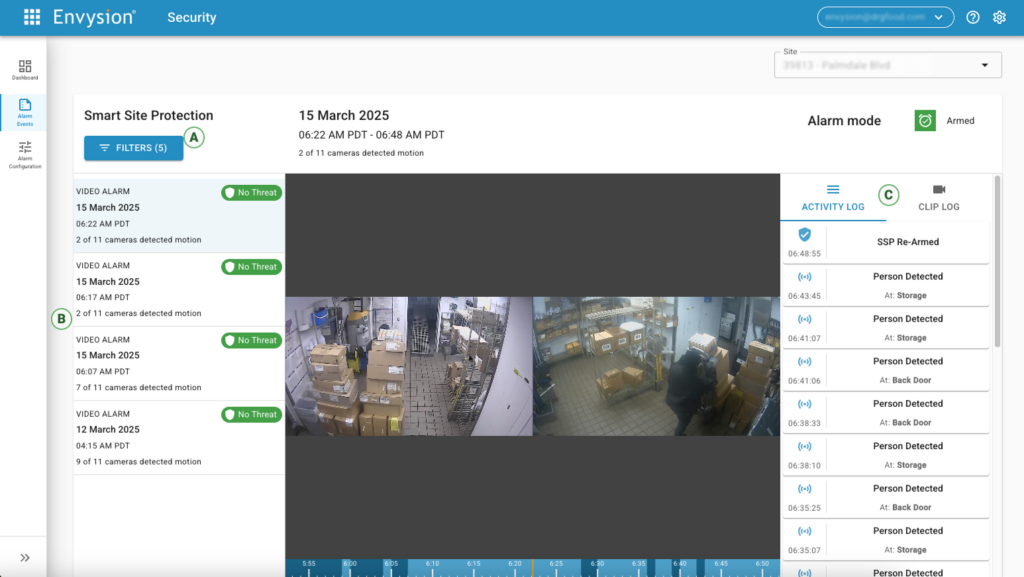
Through this page, users can:
A) filter events by date range and threat verification status,
B) review past alarm events for up to 90 days,
C) open the details for each alarm event.
To filter events:
- Click on the Filters button on the top for the page – a new popup window will appear.
- Tick proper check boxes if you want to filter by verification status.
- For date filter select range by clicking on Last 7 days.
- Choose the predefined period or custom range on the drop down list.
- If you choose a custom range, input the required date from the keyboard or by clicking on the calendar icon and choose the range.
- Click Save to apply the filter.
To check details of particular alarm event:
- Go to the Alarm Events page.
- Click on the chosen event from the list.
- Video playback will start from the beginning of the alarm event and will continue to play video from the appliance.
Apart from the video you can also check:
- The activity log – review when notifications are sent and when users respond to notifications. Please note that the timezone for all activity is based on the appliances’ timezone.
- Saved video clips stored in the cloud.
If the appliance should no longer retain the video you are looking for (up to the 90 days prior), users can click on the Clip Log and play the individual clips with the option of downloading them as well.
To see video clips:
- Click on the Clip Log icon.
- Choose the video clip based on timeline data.
- Click the
A) Video Clip button to see the clip, which will open in a new window.
B) Options button and then download icon to download the file.
Was this post helpful?
Let us know if you liked the post. That’s the only way we can improve.