Smart Site Protection™:
Setting the Store Schedule
The store schedule defines the active period during which intrusion events will be triggered when human activity is detected within an SSP-enabled camera view.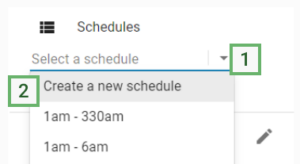
To set the store schedule:
- In the SSP’s site configuration panel click the Select Schedule under the Schedules tab name.
- From the drop down list choose Create a new schedule – this will open a new popup window with calendar edit option.
- Under Schedule Name in the pop up input Schedule Name.
- Define the SSP alarm alerts active period for each day of the week.

A) By clicking the timeline of the day of the week and dragging downward to draw a new alerting time block on the calendar.
B) For better precision you can edit already existing blocks using the text boxes below the calendar.
C) In case of mistake you can delete the time block by clicking the trash icon when the unwanted block is chosen. - Optionally add notes describing the schedule.
- Once finished, click the Save button.
To change schedule assignment:
- In the SSP’s site configuration panel click the assigned schedule name to reveal the drop down list.
- Click on the schedule name you would like to assign to the Site.
To manage unassigned schedules:
- In the Alarm Configuration page on the bottom of the screen, a list of all unassigned schedules will be presented.
- To delete the schedule hover over its name and click on the trash icon on the right site of the row.
- To edit the schedule click on its name so a new editing pop up will appear.
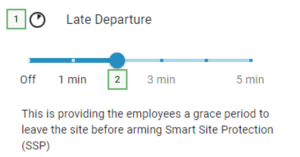
Late Departure (Employee Grace Period):
Envysion’s Late Departure feature allows a grace period for employees staying later than the businesses scheduled “end of day” monitoring time. If an alarm event is triggered within the first 1, 3, or 5 minutes, the alarm event will be classified as No Threat, the event logged like any other alarm event, but it will not be sent for verification.
 To change Late Departure setting:
- In the SSP’s site configuration panel go to the Late Departure tab.
- Move the switch to the required position.
Notice and recommendation:
- Set schedules according to the time the last employee is expected to have left for the night and the time the first employee is expected to arrive, not according to the store business hours.
- You may create more than one schedule.
- You may create more than one time block during the day.
- You may share schedules between your Sites.
- When you edit a shared schedule on one Site it will change for all assigned sites.
Was this post helpful?
Let us know if you liked the post. That’s the only way we can improve.