Reports and Intelligence:
Report Controls
Transaction Details
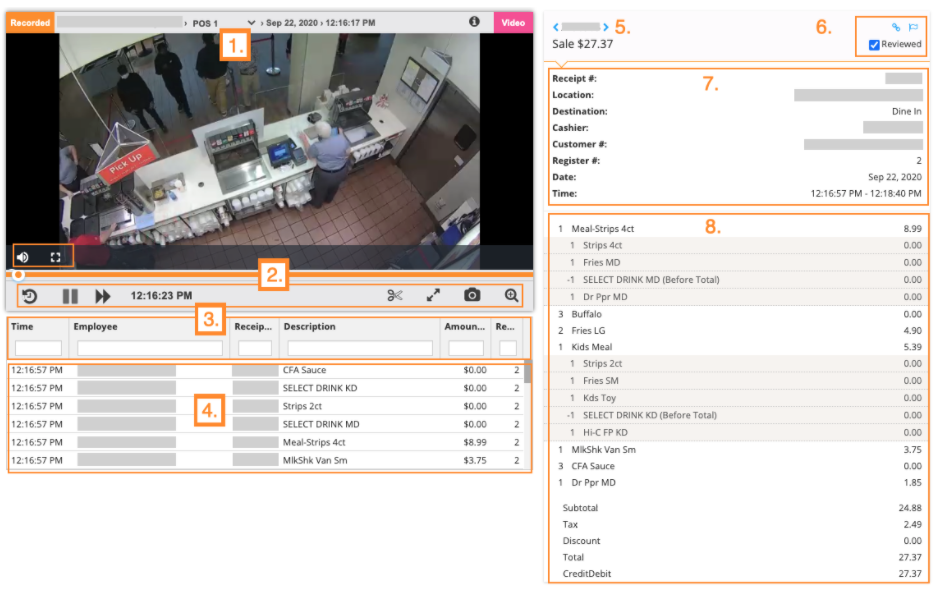
- Camera selection by default the camera mapped to the register will be used
- Player Controls
 Audio controls – only show when hovering over the video
 Fullscreen – only shows when hovering over the video
 Jump back 30 seconds
 /
/  Play / Pause
 Playback at 2x/5x/10x/20x speed, select multiple times to rotate through options
 Save a clip of the video
 Expand the size of the player
 Save a snapshot from the video
 Zoom in/out
- Receipt to Video Search- allows you to search through the Receipt to Video Sync to find a specific line of the transaction
- Receipt to Video Sync- shows what part of the receipt is being processed during video playback and allows you to jump the video to a specific point in the receipt by selecting that line
- Receipt Navigation- allows the ability to switch to previous or next receipt processed
- Transaction Controls
 Provides a link to the specific transaction to share with other Envysion users
 Creates an incident for the transaction, only applicable if utilizing Incident Management
 Indicates if the specific transaction has been viewed previously
- Transaction Summary
- Full Receipt View by Line Item
Date
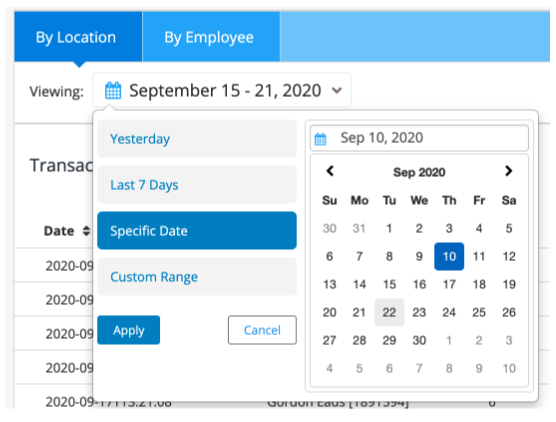
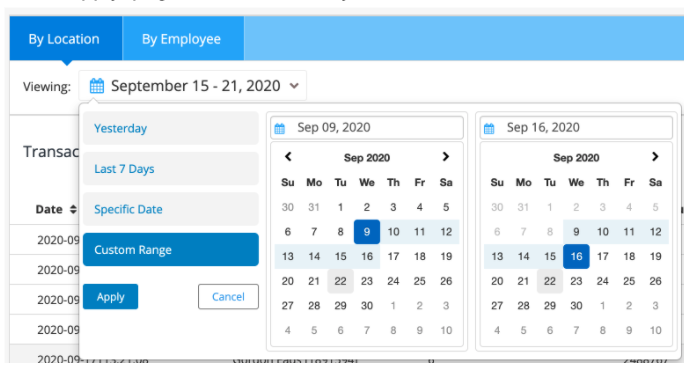
When viewing a report, date controls are located in the top right corner. Reports can be filtered to show a specific day, the last seven days, or a custom range.
- Select anywhere on the current date listed
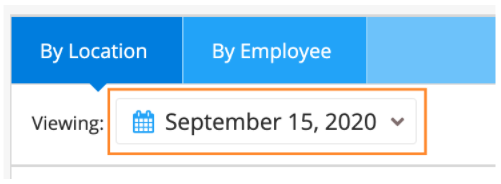
- Select the date option you would like to use
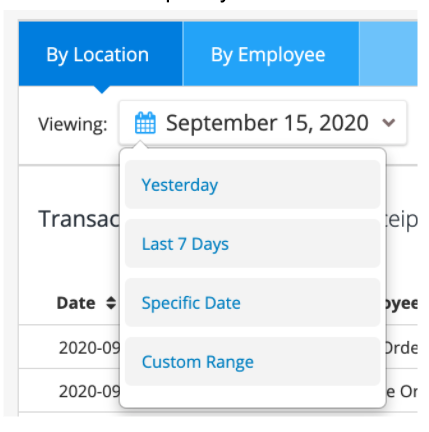
-
- Yesterday
- Select option, the page will automatically refresh
- May not apply based on POS hardware used, see Things to Know for more information
- Last 7 Days
- Select option, the page will automatically refresh
- Specific Date
- Select option, the calendar will be shown
- Select the desired day, navigating between months as needed with the arrows on either side of the month and year
- Select apply, the page will automatically refresh
- Custom Range
- Select option, two calendars will be shown
- Select the desired start date on the left-hand calendar
- Select the desired end date on the right-hand calendar
- The calendar will highlight the days between your start and end date to show what range will be reflected in the report
- Select apply, the page will automatically refresh
- Yesterday
Things to Know
- By default when a report is first opened the date range will be set to one to two days prior to the current date depending on your POS system.
- The POS system at your store determines how quickly transaction information is available in Envysion reports.
- If your POS data takes more than a day to appear in the system the option for “Yesterday” in the date controls will not return any results.
Sorting
Reports can be sorted by any column to let you view the data returned in any order. The default sort order varies from report to report. Selecting a column header once will sort from lowest to highest, selecting that column again will sort from highest to lowest.
Location vs Employee
Report data can be viewed by location or by the employee. This allows you to either have an overview of the full store or focus on the performance of a specific employee. By default, the report will start with a view by location. To switch back and forth between the two options use the tabs in the top left of the page.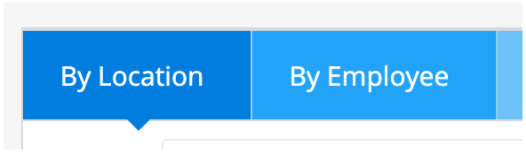
Paging
A report shows 25 rows of data per page. To access any rows beyond the first 25 displayed use the paging controls at the top right of the table.
- Return to the first page
- Previous page
- The current page being viewed; can type in a specific page value and select Go to navigate to that page
- Used to jump to a specific page number entered in 3.
- Next page
- Jump to the last page
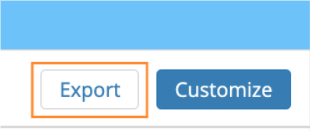
Export
Export allows you to save the report with the current filter and sort order to a .CSV file which then allows you to access the data with your preferred spreadsheet application. To export the spreadsheet, select Export from the top right of the page and then access the file from your downloads folder.
Tips
- What should I do when I find fraud?
- When you find a transaction where an employee has committed fraud the best course of action is to create an incident using Envysion Incident Management. See this article for information on adding an incident from a report. If you do not have Incident Management on your account select the scissor icon from the player to create a clip that can serve as evidence of the incident.
- Why don’t I see any transaction?
- Date Range
- Your POS system determines how quickly transaction data is available in the Envysion app, and most POS systems make their data available the next day. By default the report will start on an appropriate date based on your specific POS system, but if you change the date to today you would most likely not see any data.
- Custom Filters
- Custom filters provide you a way to refine the data returned, but depending on the filters you apply it could cause too little data to be return. If you are ever uncertain of what filters are being applied select the Customize button in the top right to reveal what filters are being applied and adjust if needed.
- Date Range