Smart Site Protection™:
Enabling Cameras
Enabling cameras means to select Site’s cameras and define areas, which we want to monitor for movement. For SSP to work as intended, we recommend creating a ‘halo of protection’ within the store. In other words, when all interior cameras are enabled throughout the store the coverage will create a ‘halo of protection’ to ensure SSP is tracking the person continually until that person(s) is no longer moving within the store (presumably has left).
To enable camera for alerting:
- In the SSP’s site configuration panel click the edit icon next to the Cameras tab – this will open a new popup window with available cameras list.
- Choose the camera by clicking the proper check box – this will open a new window.
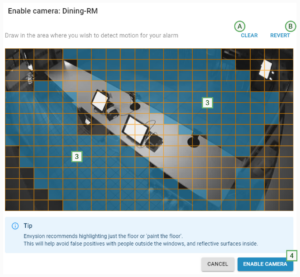
- Draw in the camera coverage area where you wish to detect motion for your alarm.
- Click the Enable Camera button to confirm your setting.
- You should get confirmation of successful change – if so click Close.
You can also:
A) Clear all changes – remove the whole blue mask.
B) Revert change – remove the last change you did during the session.
To edit already enabled camera:
- In the SSP’s site configuration panel click the edit icon next to the Cameras tab – this will open a new popup window with available cameras list.
- Click the Edit button next to the camera you would like to reconfigure.
- Draw in the camera coverage area where you wish to detect motion for your alarm.
- Click the Save button to confirm your setting.
- You should get confirmation of successful change – if so click Close.
Notice and recommendation:
- SSP enabled cameras must be installed inside the store, and capture interior activity.
- Aging analog cameras that exhibit pixel noise, lines across the image or sensor instability, cameras burdened with cobwebs and other moving obstructions, and cameras that vibrate due to their proximity with HVAC and other active systems are not recommended. If you need to set up a camera with such issues contact your CSM/AE.
- While marking the movement area in camera coverage Envysion recommends highlighting just the floor or ‘paint the floor’. This will help avoid false positives with people outside the windows, and reflective surfaces inside.
- If the camera coverage is already filled with a blue mask, firstly click the Clear button on the top of the window and then draw a new mask where you want to detect motion.
- While setting camera coverage area you can reset your action by clicking the Reset button on the top right corner of the camera configuration pop up.
Was this post helpful?
Let us know if you liked the post. That’s the only way we can improve.