Reports and Intelligence:
Customize, Save, and Share Reports
By adding filters to your reports, you can create reports specific to your needs, whether that need is measuring the usage of a new promotions, tracking late night refunds for potential fraudulent activity, or monitoring employee meal discounts for possible sweet-hearting. Reports can have any number of filters added to help you track down the specific transactions, or employees, locations, or managers. There are many standard filters available across all report templates, but some have filters unique to the data they are focused on. Once a report template has been filtered, it can be saved and added to your My Reports for easy access in the future.
How to Filter Reports
To filter any report, on the right hand side of the screen select the Filter icon. A form will pop up on the screen that will allow you to add, modify, and remove filters. Note that some reports have pre-configured filters; the parameter cannot be changed, but the operator logic and value can be.
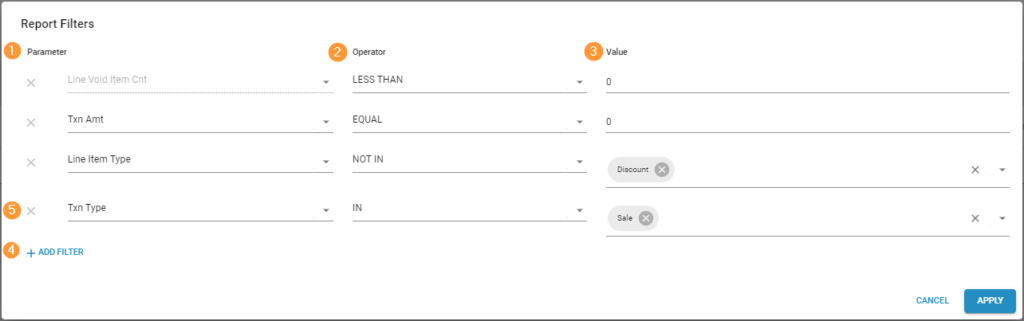
- Parameter: The thing you want to filter on such as tender, transaction amount, discount type, or sku description.
- Operator: How you want to filter the parameter. See below for Operator definitions.
- Value: What you want to filter against. This field may change between a text input field or dropdown depending on the Parameter.
- Add Filter: Adds a new filter row to the form.
- Delete Filter: Click the X to remove the row from the form.
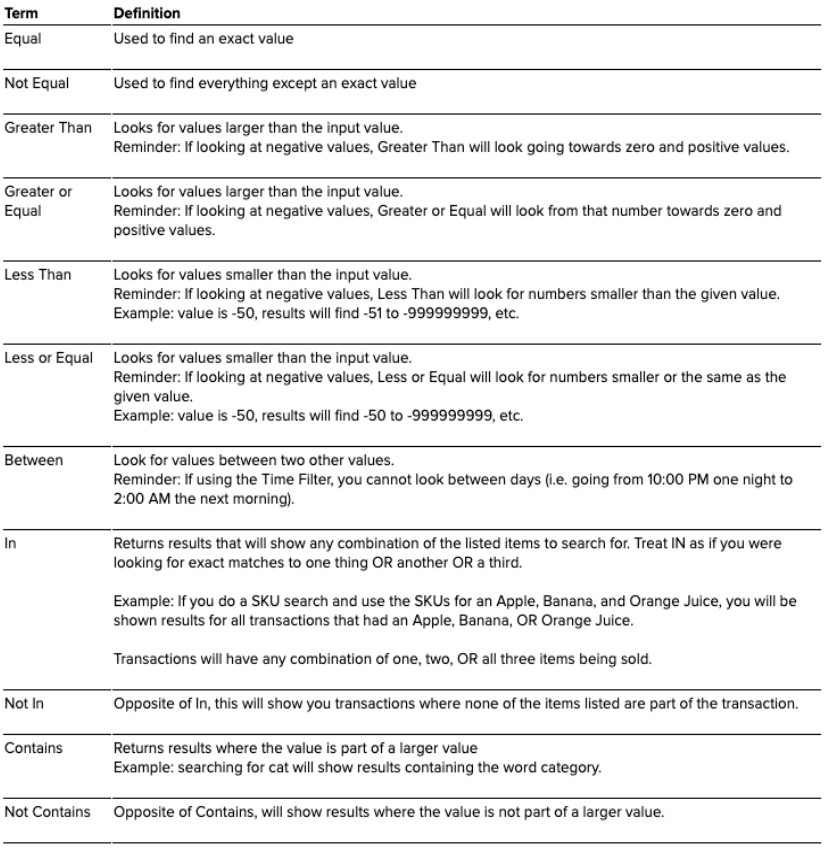
Filter Condition Definitions
Saving Reports
Saving reports is a great way to save time in the future. Once you’ve added the necessary filters to find the transactions you’re interested in, you’ll want to save the report. This will add it to your My Reports for quick access in the future. To save a report, click the Save Disc icon on the right side of the screen to load the form.
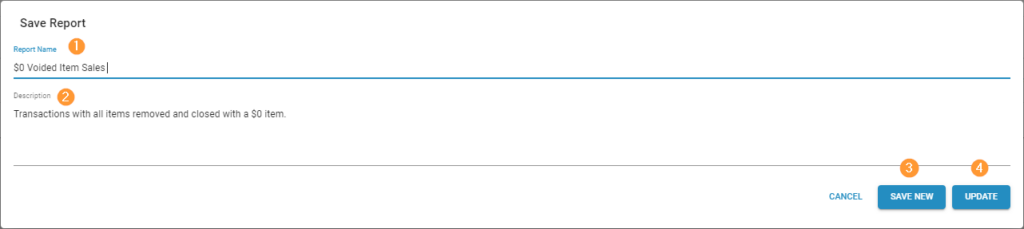
- Report Name (required): The subject of this report that will appear in your report list, or the list of reports for other users that you’ve shared this report with.
- Description (optional): A space to provide more context for the report.
- Save New: Available under two conditions
- Saving a custom report for the first time from a report template, or
- Creating a new custom report from an existing custom report. This requires a name change.
Example: You’ve built a report that is tracking all refunds over $30. The report is continuing to produce results, but the numbers are shrinking. You change the discount amount filter to $20 and there’s a lot more results. Since there are still a few refunds over $30, you want to keep this report, but also want to have a new custom report for the refunds over $20. You can use the Save New button to create a new report without overwriting your $30 refund report.
- Update:
- You want to update the name or description of your existing custom report (e.g. a simple spelling error).
- You want to overwrite the existing parameters, group by, or drilldown of your existing custom report.
Example: You’ve built a report that is tracking all refunds over $30. The report hasn’t shown any results in three weeks, indicating the reports strategy and investigations with your managers has paid off. You change the discount amount filter to $20 and there’s a several results. Since there are no more refunds over $30, you don’t want to keep this custom report. Instead of deleting this report and creating a new report, you can use the Update button to overwrite the existing parameters of your current report.
A Note on Saving Reports:
When saving a report, not only are the filters taken into account, but also the group by and drilldown states.
Example: You were investigating refunds, clicked on a particular location, were drilled down to that location’s refunds, and that is when you saved the report that is where the report will return you the next time you run this report. This can impact the usability of this report for notifications or sharing.
- If notifications are enabled, it will only be included in the digest email if that location had a refund. You may want to save reports in this manner if you’re a general manager who wants to receive an email alert listing out the refunds at your site instead of a summary count, or if you’re a Loss Prevention Manager whose saved a report drilled down to the specific transactions of an employee.
- If the report has been shared, it will only return results for users who also have access to that site.
- If you accidentally saved the report in the wrong drilldown or group by state, simply use the breadcrumbs to drill back up, or click on one of the alternate group by states and then click the Save Icon and the Update button.
Sharing Reports
Valuable reports can benefit not only you, but other users in your organization. Sharing reports with others can help save time and energy, and help ensure that new users are setup out the gate with successful reports.
Example: You are a Loss Prevention Manager, Area Coach, or District Manager. There are certain metrics you hold your teams accountable for – such as Comp / Guest Satisfaction Discounts – or transactions that should always be reviewed for validity – such as Refunds over a certain dollar amount. You can create those reports and share with your team ensuring that they have the exact reports that track the metrics and transactions of concern.
To manage sharing of reports:
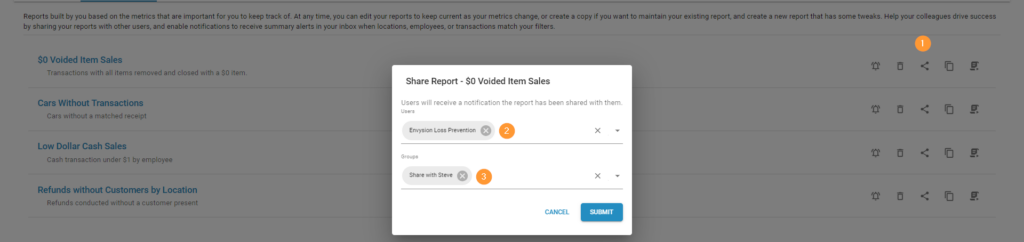
- Click the Share Icon in the Report Controls
- Select users from the dropdown to share with specific users.
- Select groups from the dropdown to share with specific groups.
- To remove individual users or groups, click the X on the chip. Click the X on the dropdown to remove all users or groups.
Note: When sharing to a group, all users will have access to that Report. This can be helpful when managing access because when new users are added to that group, they will automatically gain access to that report.