Administrative User Setup:
Bulk User Management via CSV Import
The Bulk User Management function is the most efficient way to manage access for up to 2,000 users at once. By using a single CSV file, you can streamline granting permissions to specific sites or access lists in bulk.
Key benefits:
- Efficiency: Manage large groups of users simultaneously rather than individual profiles.
- Accuracy: Reduce manual entry errors by preparing data in a spreadsheet format.
- Flexibility: Easily adjust roles, contact information, and site access across your entire organization.
- Safe to rerun: The system ignores rows that contain no changes compared to existing data, allowing you to rerun the CSV file multiple times without side effects.
The Three Management Workflows
You can use a single CSV file for three distinct purposes based on the Action column in the file:
- Option A: Bulk User Create: For onboarding entirely new sets of users.
- Option B: Bulk User Edit: For updating details or access levels for existing users.
- Option C: Hybrid Management: A combined file containing both new users to be created and existing users to be modified.
After a successful user import, the newly created users should receive an email to set their password and be able to access their site(s).
Step 1. Navigate and Get Your Base File
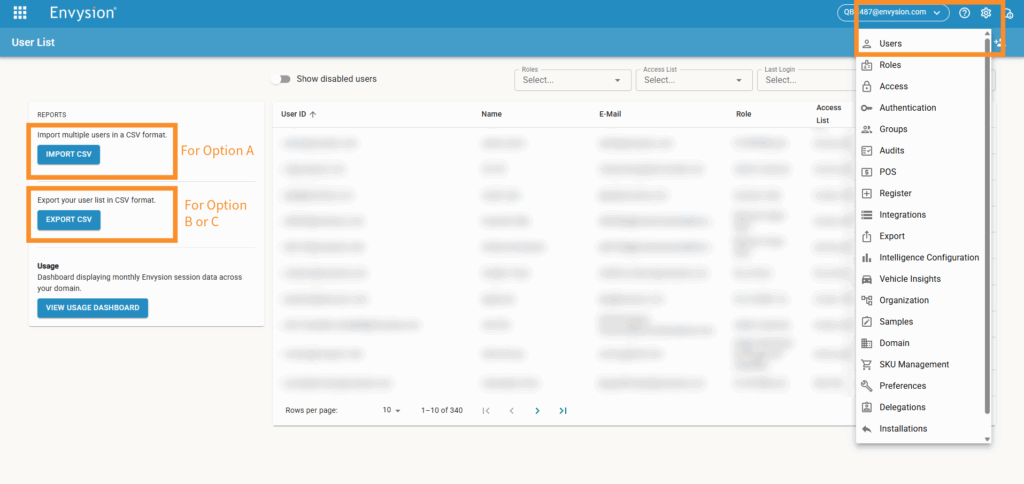
To begin, navigate to the User Management section of the application:
- Click the gear icon in the upper right-hand corner.
- Select Users.
Choose your base file type:
- For Option A (Bulk User Create): Click IMPORT CSV, then in the dialog box that appears, click DOWNLOAD EXAMPLE. This CSV file will indicate the required headers for the import to succeed.
- For Option B (Bulk User Edit) or Option C (Hybrid Management): Click the EXPORT CSV button on the left-hand panel to download your current user list. The file you download will be in the correct format for the next steps.
Step 2. Populate Your File
Open the downloaded CSV file with Google Sheets or Microsoft Excel.⚠️Critical formatting note: To prevent spreadsheets from changing the format of your data, you need to turn off auto-formatting when working on your spreadsheet:
-
- In Google Sheets: Select all the cells, click Format > Number > Plain text.
- In Microsoft Excel: Select all the cells, right-click, choose Format Cells, go to the Number tab, and set the category to Text.
Below is a breakdown of each column, its purpose, and where to source the required information. The Action column (the first column) tells the system what to do with each row.

- Action – Required field. If the field is left blank, the user will not be created, nor modified.
- Set it to Create for new users.
- Set it to Update for existing users.
- Username: Must be unique to each user. Cannot include spaces, nor ‘@’ or ‘/’ characters – Required field.
- First Name – Required field.
- Last Name – Required field.
- Display Name – Optional field.
- Email: Full email address including domain – Required field.
- Phone number – Optional field.
- Role: The exact name of a pre-existing role (internal roles are not supported). Navigate to the Roles page in your application to find the list of valid roles – Required field.
- Persona: To find existing personas, click the Create a new user icon in the Users page in your application – Optional field, defaults to ‘Not Set’ if empty.
- Access List: Enter the exact name of an existing Access List – Optional field, can be empty if the Sites field is populated.
- Sites: A semicolon-separated list of Site Names and Store Codes. Find existing Site Names and Store Codes on the Sites page in your application. – Optional field, can be empty if the Access List field is populated.
- SSO bypass: Set to True or False. – Optional field, will default to false if empty.
- Allow Address: Enter a valid IP address or domain to specify login locations – Optional field.
⚠️ Important validation rules:
- Access assignment: You must assign a user to either an Access List or a Site, but not both.
- Modifiable data: For Update actions, all fields except the Username can be modified.
Step 3. Upload and Review
- Save your file as a CSV.
- Return to the Users page in the application and click IMPORT CSV.
- Drag and drop your prepared CSV file or click to browse.
- Once processed, a summary will display the results.
- If there are failures, click DOWNLOAD RESULTS to view a line-by-line report of the errors.
Troubleshooting Common Errors
- CSV file is not in the right format: The headers in your file do not match the template or original export. Please download the example file or review the headers from the export.
- Invalid access assignment: Both the “Access List” and “Sites” columns have been populated. Please clear one of these columns.
- Site does not exist: If the site for a user does not exist, the user will not be created. Resubmit the CSV file after the site has been created (from Salesforce) to retry user creation.
- User already exists: If a user with the same username already exists, the user will not be modified.
- Invalid allow address: The provided IP address or domain format is invalid.
- User does not exist: The user does not exist and therefore cannot be updated.
- Formatting issues: If you see formatting issues upon downloading and reviewing your results, please follow the steps in Appendix 1.
Appendix 1: Tips for Formatting Issues When Viewing the Downloaded Results
Using Google Sheets:
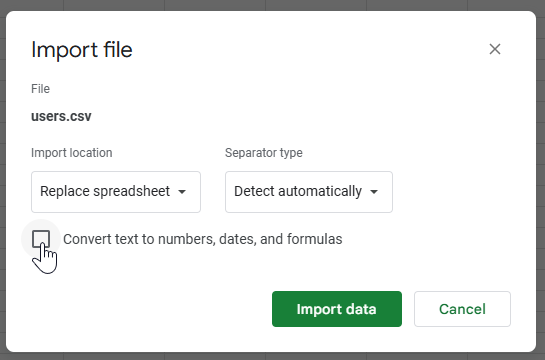
- Instead of double-clicking the file that you downloaded to view your results, open a new Google sheet and click File > Import.
- In the dialog box that opens, select the CSV file that you downloaded.
- Turn off formatting by unticking the box Convert text to numbers, dates, and formulas.
- Click Import data and view your results.
Using Microsoft Excel:
- Instead of double-clicking the file that you downloaded to view your results, open Microsoft Excel and start a new workbook.
- Click Data > Get & Transform Data group > Get Data > Legacy Wizards > From Text (Legacy).
- Text Import Wizard – Step 1 of 3: Choose Delimited and click next.
- Text Import Wizard – Step 2 of 3: Choose your Delimiter (usually Comma). Click next.
- Text Import Wizard – Step 3 of 3: Select the Sites column in the data preview, and change the format from General to Text.
- Click finish.
